How to Install Luxury Vinyl Plank Flooring: Complete DIY Guide
A complete step-by-step guide to installing luxury vinyl plank flooring yourself — from subfloor preparation to finishing touches. Save thousands on labor with this beginner-friendly flooring project.
Why LVP Is the King of DIY Flooring
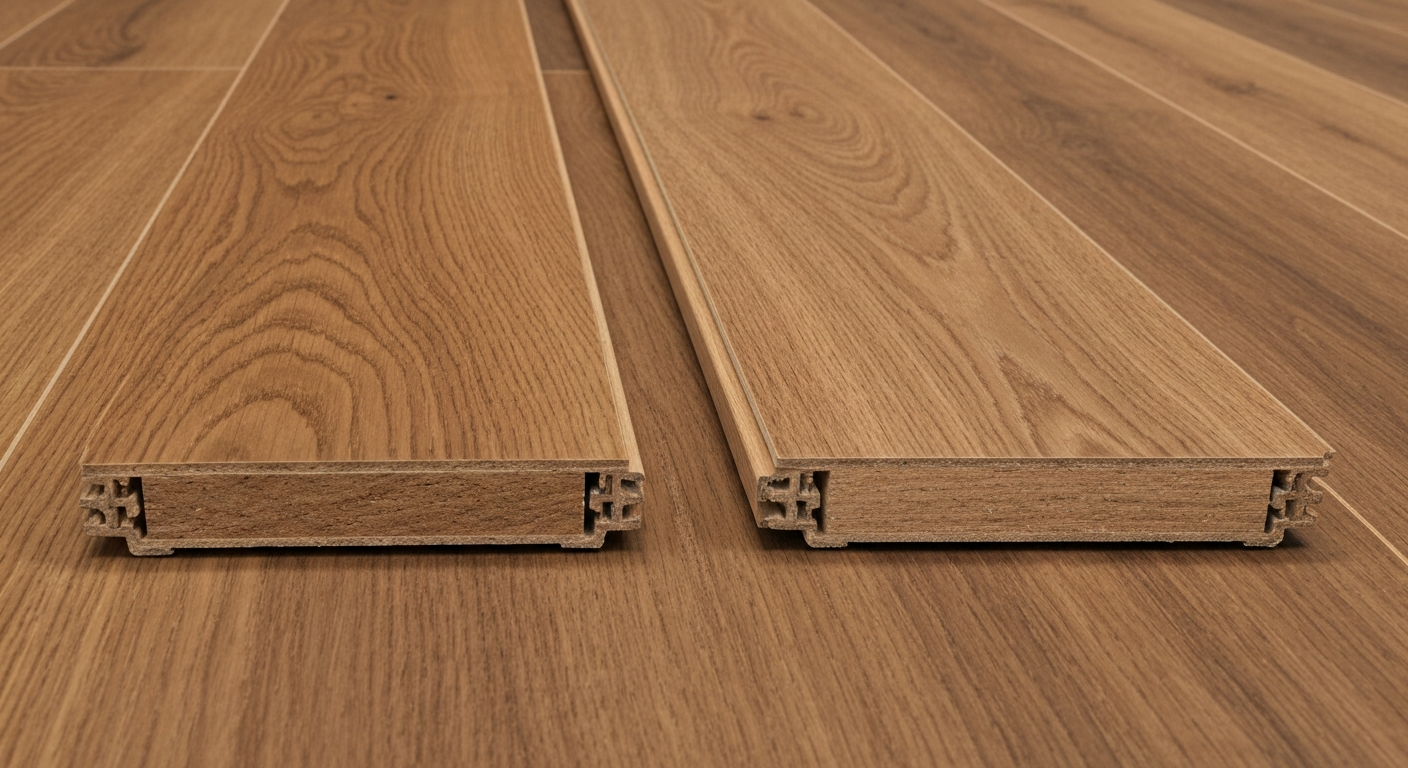
Luxury vinyl plank flooring has taken over the residential flooring market for good reason. It is waterproof, durable, affordable, and — critically for DIYers — designed to install without glue, nails, or any specialized skills. The click-lock system means planks snap together like puzzle pieces. If you can use a tape measure and a utility knife, you can install LVP.
The labor savings are substantial. Professional LVP installation typically costs $3-6 per square foot for labor alone. A 300-square-foot room at $4/sq ft means $1,200 in labor you keep in your pocket by doing it yourself.
This guide walks through every step, from assessing your subfloor to clicking in the last plank.
Tools and Materials
Tools
- Tape measure (25 ft minimum)
- Utility knife with fresh blades
- Speed square or T-square
- Pull bar for flooring
- Rubber mallet
- Tapping block (do not use a scrap piece of LVP — purpose-built tapping blocks protect the locking mechanism)
- LVP/laminate floor cutter (optional but makes the job much faster — you can use a utility knife and straightedge instead)
- Spacers (1/4 inch — usually included with the flooring)
- Pencil
- Knee pads (trust me on this one)
- Level (4 ft preferred)
- Pry bar (for removing existing baseboard)
Materials
- Luxury vinyl plank flooring — order 10% extra for cuts and waste
- Underlayment (if not pre-attached to your planks)
- Transition strips (T-molding, reducer strips, or stair nosing as needed)
- Quarter-round or shoe molding (to cover expansion gaps at walls)
- Construction adhesive (for transition strips)
Step 1: Evaluate and Prepare Your Subfloor
The subfloor is the foundation of your entire installation. LVP is thin (typically 4-8mm) and every subfloor imperfection telegraphs through the finished surface. Spend time here and the rest of the job goes smoothly. Rush this step and you will regret it every time you walk across a lump.
Concrete Subfloors
- Moisture test: Tape a 2x2 ft piece of plastic sheeting to the floor and leave it for 48 hours. If moisture collects underneath, you have a vapor issue that needs to be addressed before installing any flooring. Most LVP underlayments include a vapor barrier, but severe moisture issues need professional evaluation.
- Levelness: Place a 4-foot level on the floor in multiple spots. LVP manufacturers typically require the floor to be flat within 3/16 inch over 10 feet. Low spots should be filled with floor leveling compound. High spots can be ground down with a concrete grinder (rent one for $50-75/day).
- Cleanliness: Sweep and vacuum thoroughly. Any grit or debris left on the subfloor will create lumps under the finished floor.
Plywood/OSB Subfloors
- Check for squeaks: Walk the entire floor and note squeaky areas. Drive screws into the subfloor at squeak locations to secure it to the joists underneath. Fix squeaks now — you will not be able to after the flooring is down.
- Check for damage: Replace any water-damaged, delaminated, or soft sections of plywood. LVP needs a solid base.
- Levelness: Same 3/16-inch-per-10-feet rule applies. Sand high spots and fill low spots with floor leveling compound.
- Fasteners: Make sure all screws and staples are flush or slightly below the surface.
Existing Flooring
LVP can be installed over many existing hard floors including tile, hardwood, and existing vinyl — as long as the surface is flat, clean, and in good condition. You cannot install over carpet. If installing over tile, fill any grout lines deeper than 1/8 inch with floor leveling compound.
Step 2: Acclimate the Flooring
Bring your LVP boxes into the room where they will be installed at least 48 hours before installation. This lets the material adjust to the room’s temperature and humidity. Stack the boxes flat — do not stand them on end.
The room should be between 65-85 degrees Fahrenheit during acclimation and installation. If you are installing in a new construction home or a room without climate control, get the HVAC running first.
Step 3: Plan Your Layout
Good planning prevents bad surprises. Here is what to figure out before you click a single plank.
Determine Direction
LVP typically looks best running parallel to the longest wall in the room, or running toward the primary light source (usually the largest window). In hallways, always run planks lengthwise down the hall.
Calculate the First and Last Row Width
Measure the room width and divide by the plank width. The last row should be at least 1/3 of a plank wide — a sliver of flooring along the far wall looks terrible and is difficult to install.
Example: Room is 144 inches wide. Planks are 7 inches wide. 144 / 7 = 20.57 planks. The last row would be about 4 inches wide (0.57 x 7). That is fine. But if the math gives you a last row of 1-2 inches, rip the first row narrower to balance it out.
Plan for Staggering
End joints should be staggered by at least 6 inches between adjacent rows — most manufacturers require 8-12 inches. A randomized stagger looks more natural than a repeating pattern. Vary the length of your starting plank in each row (full plank, 2/3, 1/3, and so on).
Step 4: Install Underlayment
If your LVP planks have a pre-attached underlayment pad (check the back of a plank), skip this step. If not, roll out your underlayment across the subfloor.
- Butt the edges together — do not overlap
- Tape the seams with underlayment tape
- On concrete, use underlayment with a built-in vapor barrier and overlap the vapor barrier edges by 6 inches, taping them down
- Trim excess at walls with a utility knife
Only roll out as much underlayment as you need for the section you are working on. Walking on loose underlayment is a slip hazard.
Step 5: Install the First Row
The first row sets the alignment for the entire floor. Take your time here.
Step 5a: Start in the left corner of the room (assuming you are working left to right). Place 1/4-inch spacers against the wall. These create an expansion gap that allows the floor to expand and contract with temperature changes. The baseboard or quarter-round will cover this gap.
Step 5b: Place the first plank with the tongue side facing the wall. If your first row needs to be ripped narrower (based on your layout math), rip it now using a utility knife and straightedge. Score the face deeply, snap, and clean up the edge.
Step 5c: Click the second plank into the end of the first plank at a slight angle, then press down flat. Continue across the room.
Step 5d: Measure and cut the last plank in the row. Leave the 1/4-inch expansion gap at the far wall. Use the cut-off piece to start the next row (as long as it is at least 8 inches long and provides adequate stagger).
Step 6: Install Remaining Rows
This is where you find your rhythm.
Step 6a: Angle the long side of the new plank into the previous row at about 20 degrees. Press down to click it into place. You should hear and feel a distinct click when the locking mechanism engages.
Step 6b: Use the tapping block and rubber mallet to close any gaps along the long seam. Tap gently — LVP locking mechanisms are not as robust as hardwood tongue-and-groove, and you can crack them with excessive force.
Step 6c: For the end joints, angle the plank into the long side first, then use the pull bar at the wall end to close the end joint gap.
Step 6d: Check your stagger pattern every few rows. It is easy to fall into a repeating pattern that looks unnatural.
Step 6e: Maintain the 1/4-inch expansion gap along all walls and fixed objects (cabinets, islands, columns).
Cutting Around Obstacles
- Door frames: Use an oscillating multi-tool or a hand saw laid flat on a scrap piece of flooring to undercut the door frame. The flooring slides under the frame for a clean look.
- Pipes: Drill a hole 1/2 inch larger than the pipe diameter. Cut a straight line from the hole to the nearest edge of the plank. Slide the plank around the pipe and glue the cut-off piece back in place. Cover with a pipe escutcheon ring.
- Toilets and vanities: Install flooring up to the toilet flange or vanity — do not install under heavy fixtures. Use a contour gauge to trace complex shapes and transfer to the plank for cutting.
Step 7: Install the Last Row
The last row almost always needs to be ripped to width. Measure the gap at several points along the wall (walls are rarely perfectly straight), subtract 1/4 inch for the expansion gap, and mark the planks for ripping.
Use a utility knife and straightedge for the cut — score and snap works well for straight rip cuts on LVP. The pull bar is essential for the last row since there is no room to swing a mallet.
Step 8: Finishing Touches
Transition Strips
Install transition strips wherever the LVP meets a different flooring type, at doorway thresholds, and at any expansion gap mid-room (required for rooms longer than 40 feet in most manufacturer specs).
- T-molding: Where two floating floors of the same height meet
- Reducer: Where LVP meets a lower floor surface
- Threshold: At exterior doors or where flooring stops at a step
Secure transition strip tracks with adhesive or screws, then snap the visible trim piece into the track.
Baseboard and Quarter-Round
Reinstall your baseboard or add quarter-round molding to cover the expansion gap. Nail baseboard and quarter-round into the wall, not into the floor — the floor needs to float freely underneath.
Remove Spacers
Pull all spacers before installing baseboard. This sounds obvious, but after hours of installation, it is easy to forget a few.
Pro Tips for a Professional-Looking Installation
-
Mix planks from multiple boxes. LVP batches can have slight color variations. Pulling planks from 3-4 boxes at once ensures a natural, blended look rather than visible color blocks.
-
Reverse alternate planks. Some LVP has directional patterns. Flipping every other plank 180 degrees prevents a repetitive look.
-
Keep the room warm. LVP is more flexible at 70+ degrees and more brittle in cold conditions. Working in a heated room makes planks easier to click and reduces the chance of cracking a locking tab.
-
Use a sharp blade. Change your utility knife blade every 10-15 cuts. A dull blade tears instead of cutting, leaving ragged edges.
-
Dry-lay the first three rows. Before clicking anything together permanently, lay out the first three rows without clicking to check your stagger pattern and identify any issues.
Common Mistakes to Avoid
- Skipping subfloor prep. This is the number one cause of LVP problems. A bump in the subfloor becomes a bump in your floor — and a failure point for the locking mechanism.
- Forgetting expansion gaps. Without gaps, the floor buckles when it expands in warm weather. This is the most common DIY LVP failure.
- Clicking planks together flat. Always angle in at 20 degrees and press down. Trying to click planks together flat damages the locking mechanism.
- Not undercutting door frames. Cutting flooring to fit around a door frame looks amateurish. Undercutting takes five minutes and looks professional.
- Installing under heavy appliances. Refrigerators and dishwashers sit on the subfloor, not on floating floor. The weight prevents the floor from expanding freely.
Maintenance Tips
LVP is one of the lowest-maintenance flooring options available:
- Sweep or vacuum regularly (use the hard floor setting — beater bars can scratch the surface)
- Mop with a damp mop and a pH-neutral cleaner — never use steam mops, as the heat can damage the planks
- Put felt pads under furniture legs
- Use mats at exterior doors to catch grit
- Clean spills promptly — while LVP is waterproof on top, water can seep through seams and affect the subfloor
The Bottom Line
LVP installation is one of the most rewarding DIY projects because the result looks professional, the process is genuinely manageable for an intermediate DIYer, and the savings are significant. Budget a full weekend for your first room — you will be slow while you learn the rhythm. By the second room, you will wonder why anyone pays to have this installed.