How to Patch Drywall Like a Pro: Small Holes to Large Repairs
Learn how to patch drywall for any size hole — from nail pops to fist-sized damage. This step-by-step guide covers the tools, materials, and techniques to get an invisible repair every time.
Why Every Homeowner Needs This Skill
Holes in drywall happen. Doorknobs punch through without stops. Picture hangers leave their mark. Kids happen. Moving furniture happens. The good news is that drywall patching is one of the most forgiving DIY skills you can learn — and once you get the hang of it, you will never pay someone else to do it again.
This guide covers three tiers of repair: small nail and screw holes, medium holes up to about 4 inches, and large holes that need a proper patch. Each one is a distinct technique, and knowing which to use is half the battle.
Tools and Materials You Will Need
For All Repairs
- Putty knife set (2”, 4”, 6”) — you will use different sizes for different stages
- Lightweight spackle (for small holes) or all-purpose joint compound (for medium and large)
- Fine-grit sandpaper (150-220 grit) or a sanding sponge
- Primer (PVA or all-purpose)
- Paint to match your wall
Additional for Medium Holes
- Self-adhesive mesh drywall patch (comes in various sizes)
Additional for Large Holes
- A piece of drywall (same thickness as your wall — usually 1/2”)
- Drywall mesh tape
- A drywall saw or utility knife
- A furring strip or scrap of 1x3 lumber
- Drywall screws
- A drill or screwdriver
Level 1: Small Holes (Nail Pops, Screw Holes, Tiny Dings)
These are the most common drywall repairs and the easiest to fix. We are talking about holes smaller than a dime — nail holes, screw holes, small dents, and nail pops.
Step-by-Step
Step 1: Prepare the hole. If there is a nail or screw still in place, remove it. For nail pops (where the nail has pushed a bump in the drywall), push the nail back in or remove it and drive a drywall screw 1-2 inches above or below the pop to resecure the drywall to the stud.
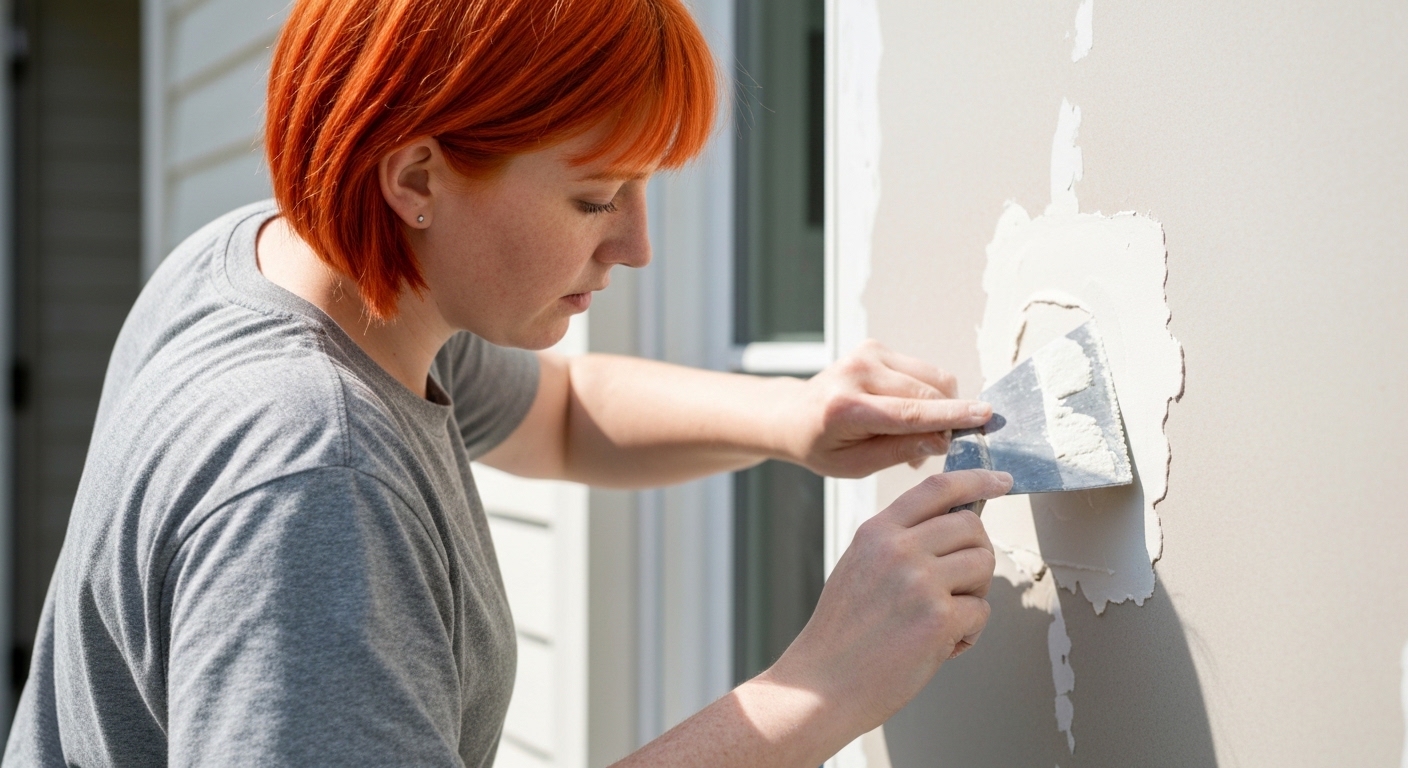
Step 2: Clean the area. Use your putty knife to scrape away any loose paper or debris around the hole. You want a clean, slightly recessed area to fill.
Step 3: Apply spackle. Load a small amount of lightweight spackle onto your 2” putty knife. Press it firmly into the hole, then draw the knife across the surface to smooth it flush with the wall. For nail pops, you may want to dimple the surface slightly with the handle of the knife first to create a recess.
Step 4: Let it dry. Lightweight spackle dries in 30-60 minutes. It will shrink slightly as it dries, which is normal.
Step 5: Apply a second coat if needed. If the patch shrank below the wall surface, apply another thin layer and smooth it out. Most small holes only need one coat.
Step 6: Sand smooth. Once fully dry, lightly sand with 150-grit sandpaper or a sanding sponge. You are looking for a surface that feels perfectly flush with the surrounding wall when you run your hand over it.
Step 7: Prime and paint. Apply a thin coat of primer over the patch before painting. Skip the primer and you will see the patch through the paint — it absorbs differently than the surrounding wall.
Pro Tips for Small Holes
- Use your finger for tiny holes. For nail holes in smooth walls, a dab of spackle pushed in with your fingertip and wiped clean often gives a better result than a putty knife.
- DAP Fast Dry spackle is excellent for small repairs. It dries in minutes and sands easily.
- Pink-to-white spackle removes the guesswork — it changes color when dry.
Level 2: Medium Holes (1-4 Inches)
Medium holes are too big for spackle alone but not big enough to need a full drywall patch. This is where self-adhesive mesh patches earn their keep. Common causes include doorknob impacts, anchoring failures, and accidental tool strikes.
Step-by-Step
Step 1: Clean the hole. Remove any loose drywall, paper, or debris. If the edges of the hole are ragged, use a utility knife to trim them clean. The patch will adhere better to a clean edge.
Step 2: Apply the self-adhesive mesh patch. Center the patch over the hole and press it firmly against the wall. These patches are essentially fiberglass mesh with an adhesive backing — they bridge the hole and give the joint compound something to grip.
Step 3: Apply the first coat of joint compound. Using a 4” or 6” putty knife, spread a thin layer of all-purpose joint compound over the entire patch, extending 2-3 inches beyond the edges. Press firmly to embed the compound into the mesh. You do not need to fill the hole completely on this coat — just cover the mesh evenly.
Step 4: Let it dry completely. Joint compound takes longer than spackle — usually 12-24 hours depending on thickness and humidity. Do not rush this step. If you sand or add a second coat over wet compound, the repair will crack.
Step 5: Apply a second coat. Using a 6” knife, apply another thin layer. Feather the edges further out from the patch — you want a gradual transition from patch to wall, not a visible edge. The key word is thin. Multiple thin coats beat one thick coat every time.
Step 6: Sand and evaluate. After the second coat dries, sand lightly with 150-grit. Run your hand across the surface. If you can feel the edge of the patch, apply a third coat with an even wider feather. If it feels smooth, you are done with compound.
Step 7: Prime and paint. Just like with small holes, always prime before painting.
Pro Tips for Medium Holes
- Slightly overfill and sand back. It is much easier to sand down a slight excess than to build up a depression.
- Feather aggressively. The secret to an invisible patch is feathering the joint compound far beyond the patch edges. A 4-inch patch might need a 10-inch feathered area to be invisible.
- Use a bright side light to check your work. Hold a flashlight or work light flat against the wall. Imperfections that are invisible under normal lighting become glaringly obvious with a raking light.
- Do not sand between coats if the surface is smooth. Only sand to remove ridges or bumps. Each coat should be smoother than the last.
Level 3: Large Holes (Larger Than 4 Inches)
For holes bigger than what a self-adhesive patch can handle, you need to cut a new piece of drywall and install it. This sounds intimidating, but the technique is straightforward. This is the “California patch” or “butterfly patch” method, and it gives cleaner results than some other approaches.
The California Patch Method
This technique uses a slightly oversized piece of drywall as its own backer — no need for furring strips or backing boards for holes up to about 8 inches.
Step 1: Cut a drywall patch. Cut a piece of new drywall about 2 inches larger than the hole in each direction. So for a 5-inch hole, cut a roughly 9x9 inch piece.
Step 2: Score the back. Flip the patch over. Score the drywall (the white gypsum core) 1 inch from each edge, but do not cut through the face paper. Snap away the gypsum from the border, leaving just the face paper as a flap around the patch.
Step 3: Trace and cut the wall. Hold the gypsum portion of your patch (not the paper flaps) against the wall over the hole. Trace around the gypsum only. Cut along this line with a drywall saw or utility knife.
Step 4: Test fit. The gypsum portion should drop into the hole while the paper flaps lay flat against the surrounding wall. Trim as needed for a snug fit.
Step 5: Apply joint compound. Spread a thin layer of joint compound on the wall surface around the hole — where the paper flaps will sit.
Step 6: Set the patch. Press the patch into the hole and smooth the paper flaps into the joint compound. Use your putty knife to embed the flaps and remove excess compound.
Step 7: Coat, dry, repeat. Apply joint compound over the entire patch area, covering all paper edges. Let it dry, sand lightly, and apply a second and third coat as needed, feathering each coat further out.
The Furring Strip Method (for Very Large Holes)
For holes larger than 8-10 inches, the California patch method is not sturdy enough. Here you need a backing board.
Step 1: Square the hole. Use a drywall saw and a straightedge to cut the hole into a clean rectangle.
Step 2: Install backer boards. Cut two pieces of 1x3 or furring strip about 4 inches longer than the hole height. Slide them behind the drywall on each side of the hole, and screw through the existing drywall into the backer boards. These give you something to attach the new piece to.
Step 3: Cut and install the patch. Cut a piece of new drywall to fit the rectangular hole. Screw it into the backer boards.
Step 4: Tape the seams. Apply mesh or paper drywall tape over all four seams.
Step 5: Mud and finish. Apply joint compound over all taped seams, feathering out 6-8 inches from each seam. Three coats is standard: embed the tape, fill and smooth, and final skim.
Step 6: Sand, prime, paint. Same finishing process as always.
Matching Texture
If your walls have any texture (orange peel, knockdown, skip trowel), you will need to match it over the patch before painting. Here is how:
- Orange peel: Use a hopper-style spray texture gun or a can of spray texture like Homax. Practice on cardboard first to dial in the pattern.
- Knockdown: Apply spray texture, wait 5-10 minutes until it starts to set, then lightly drag a knockdown knife across it.
- Skip trowel: Apply joint compound with a trowel in random arcing motions. This one takes practice to match existing texture.
- Smooth walls: Lucky you — just sand and paint.
Always practice texture matching on a scrap piece of drywall or cardboard before applying to the wall.
Common Mistakes to Avoid
- Applying coats too thick. Thick coats crack, shrink unevenly, and take forever to dry. Three thin coats always beat one thick one.
- Sanding too aggressively. You are smoothing, not shaping. Light pressure with fine-grit paper is all you need. Sand through the compound into the paper tape and you are starting over.
- Skipping primer. Unprimed patches absorb paint differently, creating a visible “flash” mark even under two coats of paint.
- Not feathering enough. The most common reason a patch is visible is a hard edge where compound meets wall. Feather the compound 6-8 inches beyond the patch for a truly invisible repair.
- Rushing dry times. Joint compound looks dry on the surface before it is dry underneath. Follow the manufacturer’s recommended dry times, or you will be doing the job twice.
When to Call a Pro
Most drywall patching is well within DIY territory. However, consider calling a professional for:
- Water-damaged drywall — the underlying moisture source needs to be found and fixed first, and mold may be present behind the wall.
- Entire wall or ceiling resurfacing — hanging and finishing full sheets of drywall is a completely different skill set from patching.
- Plaster walls — plaster repair has different techniques and materials. Applying drywall compound to plaster often leads to poor adhesion and cracking.
- Ceiling patches — working overhead with joint compound is significantly harder than wall work. It is doable, but it is a workout.
The Bottom Line
Drywall patching is one of the highest-value DIY skills because the cost difference between doing it yourself and hiring someone is enormous — we are talking $10-30 in materials versus $100-300 for a handyman visit. Once you have patched your first few holes, it becomes second nature. Grab a putty knife, some compound, and your patience, and give it a shot.