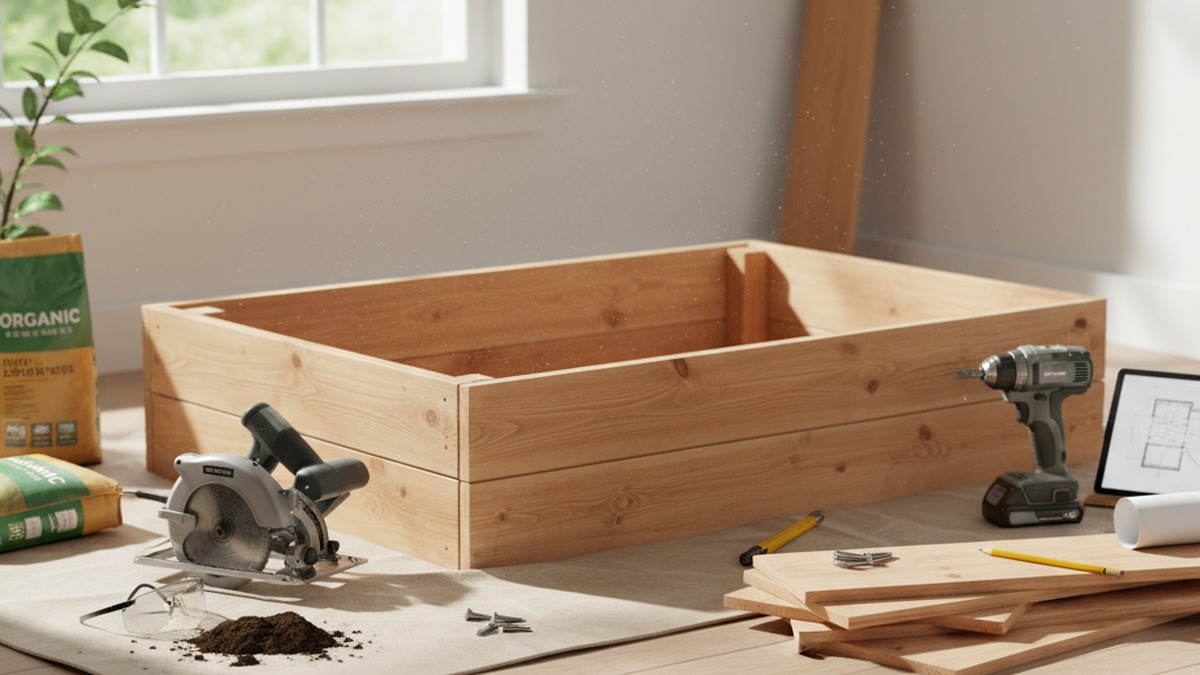
7 Cedar Raised Garden Bed Plans (Free PDF Cut Lists)
Raised garden beds have transformed gardening for countless enthusiasts, offering better soil control, improved drainage, easier access, and extended growing seasons. But the material you choose for your raised bed is crucial, especially if you’re growing edibles. At build-coded.com, we believe in quality, durability, and safety, which is why we wholeheartedly recommend cedar for your next raised garden bed project.
Why Cedar? The Gold Standard for Raised Beds
Cedar stands out as the premier choice for raised garden beds, and for good reason:
- Natural Rot Resistance: Cedar contains natural oils and resins that act as powerful preservatives, making it inherently resistant to rot, decay, and insect infestation. Unlike untreated pine or fir, which can decompose in just a few years when exposed to soil and moisture, cedar boasts an impressive lifespan of 10-15 years, often longer with proper care. This means less frequent replacement and more time enjoying your garden.
- Chemical-Free & Food-Safe: This is perhaps the most critical advantage. Cedar is a naturally durable wood, requiring no chemical treatments to enhance its longevity. This ensures that no harmful substances will leach into your soil, making it perfectly safe for growing organic vegetables, herbs, and fruits. In contrast, pressure-treated lumber, while durable, often contains chemicals (historically arsenic, now copper-based compounds) that can contaminate your soil and plants.
- Aesthetic Appeal: Beyond its practical benefits, cedar offers a beautiful, rustic appearance that naturally complements any garden or outdoor space. Its rich, warm tones weather gracefully to a soft, silvery-grey patina over time, adding character and charm.
- Stability: Cedar is a relatively stable wood, meaning it’s less prone to warping, twisting, or shrinking compared to many other lumber types. This stability contributes to the long-term integrity of your raised bed structure.
Understanding Cedar Grades
When purchasing cedar for your project, you’ll typically encounter a couple of common grades:
- Knotty Cedar (Select Knotty or Standard & Better): This is the most common and cost-effective grade. It features visible knots, which give it a rustic and natural charm. For most raised garden bed projects, knotty cedar is perfectly sufficient and provides excellent durability.
- Clear Cedar (Clear Vertical Grain or A & Better): This grade is virtually free of knots and imperfections, offering a smooth, uniform appearance. It’s more expensive than knotty cedar and often reserved for fine woodworking or exterior siding where aesthetics are paramount. For functional raised beds, the added cost is usually unnecessary.
For all the plans outlined below, we assume the use of knotty cedar for its balance of cost-effectiveness and performance.
To Seal or Not to Seal? (The Interior Question)
This is a common question, and the answer for raised beds is clear: Do NOT seal the interior of your cedar raised bed or any surface that will come into contact with soil or plants. While exterior sealants can help maintain cedar’s original color and offer additional protection, applying them to the interior of a raised bed defeats the purpose of using chemical-free wood. Even “food-safe” sealants can contain compounds that are not meant for direct, continuous contact with soil where food is grown. Cedar’s natural resistance is sufficient. Let it do its job.
For the exterior, you can apply an exterior-grade, non-toxic, water-based sealant if you wish to preserve the original color longer, but it’s entirely optional. Most gardeners prefer to let the cedar weather naturally, embracing its evolving aesthetic.
Ready to get started? Here are 7 fantastic cedar raised garden bed plans, complete with dimensions, lumber lists, estimated costs (2026 pricing), tools, build times, skill levels, and step-by-step summaries. Don’t forget to download the free PDF cut lists for each plan for precise measurements!
1. The 4x4 Starter Square (Beginner)
This classic 4x4 raised bed is the perfect entry point for new gardeners or those with limited space. It’s quick to build, affordable, and provides ample room for a variety of vegetables, herbs, or flowers.
- Dimensions: 4’ L x 4’ W x 11” H (2 boards high)
- Lumber List:
- 4x 2x6x8 cedar boards
- 1x box 2.5” galvanized or stainless steel deck screws
- Estimated Material Cost (2026): $90 (This estimate includes lumber and fasteners, but prices can vary by region and supplier.)
- Tools Required: Tape measure, pencil, speed square, circular saw (or miter saw), drill/driver, safety glasses, ear protection.
- Build Time: 1-2 hours
- Skill Level: Beginner
- 5-Step Build Summary:
- Cut Your Boards: From each of your four 2x6x8 cedar boards, cut two 4-foot lengths. You will now have eight 4-foot long 2x6 cedar boards.
- Assemble First Layer: Lay four of the 4-foot boards on a flat surface to form a 4x4 square. Overlap the ends at the corners (e.g., two sides butt against the ends of the other two). Pre-drill pilot holes to prevent splitting.
- Secure Corners (Layer 1): Use your drill/driver to secure each corner with 2-3 deck screws, ensuring the frame is square using your speed square.
- Stack Second Layer: Place the remaining four 4-foot boards directly on top of the first layer. Stagger the joints so that the boards on the second layer overlap the joints of the first layer for added strength.
- Final Secure: Drive 2-3 deck screws through the top layer into the bottom layer at each corner and along the length of the boards (every 12-18 inches) to firmly connect the two layers.
2. The 4x8 Classic Rectangle (Beginner)
The 4x8 raised bed is a gardener’s favorite, offering generous planting space ideal for row crops, diverse plant arrangements, or even small fruit trees. Its simple design makes it a breeze to build.
- Dimensions: 8’ L x 4’ W x 11” H (2 boards high)
- Lumber List:
- 6x 2x6x8 cedar boards
- 1x box 2.5” galvanized or stainless steel deck screws
- Optional: 2x 2x4x11” cedar scraps for internal corner bracing (cut from leftover 2x6 or new 2x4)
- Estimated Material Cost (2026): $150 (This estimate includes lumber and fasteners.)
- Tools Required: Tape measure, pencil, speed square, circular saw (or miter saw), drill/driver, safety glasses, ear protection.
- Build Time: 1-2 hours
- Skill Level: Beginner
- 5-Step Build Summary:
- Cut Short Sides: From two of your 2x6x8 cedar boards, cut each in half to create four 4-foot lengths. You will now have four 8-foot 2x6s and four 4-foot 2x6s.
- Assemble First Layer: Lay two 8-foot boards and two 4-foot boards on a flat surface to form an 8x4 rectangle. Position the 4-foot boards between the ends of the 8-foot boards (butt joints).
- Secure Corners (Layer 1): Pre-drill pilot holes and use your drill/driver to secure each corner with 2-3 deck screws, ensuring the frame is square. For extra rigidity, attach optional 2x4 corner braces on the inside of each corner.
- Stack Second Layer: Place the remaining two 8-foot boards and two 4-foot boards directly on top of the first layer. Stagger the joints so that the 8-foot boards on the second layer sit on top of the 4-foot boards of the first, and vice-versa.
- Final Secure: Drive 2-3 deck screws through the top layer into the bottom layer at each corner and along the length of the boards (every 12-18 inches) to firmly connect the two layers.
3. The U-Shaped Horseshoe (Intermediate)
Maximize your planting area and improve accessibility with this ergonomic U-shaped raised bed. The open center allows you to easily reach plants without stepping into the bed, minimizing soil compaction and making weeding a breeze.
- Dimensions: Overall 8’ W x 8’ D, with a 4’ wide x 4’ deep opening. Bed height 11” (2 boards high).
- Lumber List:
- 7x 2x6x8 cedar boards
- 1x box 2.5” galvanized or stainless steel deck screws
- 4x 2x4x11” cedar scraps for internal corner bracing (cut from leftover 2x6 or new 2x4)
- Estimated Material Cost (2026): $190
- Tools Required: Tape measure, pencil, speed square, miter saw (recommended for cleaner cuts), drill/driver, level, clamps, safety glasses, ear protection.
- Build Time: 3-4 hours
- Skill Level: Intermediate
- 5-Step Build Summary:
- Cut Your Pieces: From your 2x6x8 boards, cut: four 8-foot lengths (for the back and long sides) and four 4-foot lengths (for the front arms and connecting pieces). You’ll also need two 2x4x11” pieces for internal corner supports.
- Assemble Bottom Layer: Lay out two 8-foot pieces for the back and one side, and one 4-foot piece for the other side. Connect them to form an “L” shape. Then add a 4-foot arm extending from the middle of the back piece to create the “U” shape’s first arm. Repeat for the other side.
- Square and Secure Layer 1: Ensure all corners are square and the overall “U” shape is accurate. Pre-drill and secure all butt joints with 2-3 screws. Install internal 2x4 corner braces for added stability at each corner.
- Stack Second Layer: Carefully place the remaining cut boards directly on top of the first layer, staggering the joints for maximum strength. Ensure the second layer aligns perfectly with the first.
- Final Secure: Drive 2-3 deck screws through the top layer into the bottom layer at all corners and along the length of the boards (every 12-18 inches) to firmly connect the two layers, checking for levelness as you go.
4. 3-Tier Pyramid for Herbs/Strawberries (Intermediate)
This visually striking pyramid bed is perfect for showcasing herbs, strawberries, or cascading flowers. Its tiered design maximizes growing space in a compact footprint and adds a beautiful architectural element to your garden.
- Dimensions: Base 4’x4’, Middle 3’x3’, Top 2’x2’. Each tier is 11” high (2 boards high). Total height approximately 33”.
- Lumber List:
- 5x 2x6x8 cedar boards
- 1x box 2.5” galvanized or stainless steel deck screws
- 8x 2x4x11” cedar scraps for internal corner bracing (cut from leftover 2x6 or new 2x4)
- Estimated Material Cost (2026): $140
- Tools Required: Tape measure, pencil, speed square, miter saw, drill/driver, level, clamps, safety glasses, ear protection.
- Build Time: 4-5 hours
- Skill Level: Intermediate
- 5-Step Build Summary:
- Cut All Boards: From your 2x6x8 boards, cut: four 4-foot lengths (for the base tier), four 3-foot lengths (for the middle tier), and four 2-foot lengths (for the top tier). You’ll have enough leftover for internal corner braces.
- Assemble Base Tier (4x4): Form a 4x4 square with two 4-foot boards and two 4-foot boards. Secure the corners with screws and install internal 2x4 corner braces. Repeat for the second layer of the base.
- Assemble Middle Tier (3x3): In the same manner, assemble the two layers of the 3x3 square, securing corners and adding internal braces.
- Assemble Top Tier (2x2): Assemble the two layers of the 2x2 square, securing corners and adding internal braces.
- Stack and Secure: Carefully center the 3x3 middle tier on top of the 4x4 base tier. Drive long screws (3.5” or 4”) down through the middle tier into the base tier at the corners to secure. Then, center and secure the 2x2 top tier onto the 3x3 middle tier in the same way.
5. Elevated Waist-High Accessible Bed (Intermediate)
Say goodbye to bending and kneeling! This elevated raised bed brings your garden to a comfortable working height, making it ideal for gardeners with mobility issues, back pain, or those who simply prefer to garden standing up.
- Dimensions: 4’ L x 2’ W x 30” H (Bed depth 11”, 19” for legs/frame).
- Lumber List:
- 2x 2x6x8 cedar boards (for bed frame)
- 2x 4x4x8 cedar posts (for legs)
- 2x 2x4x8 cedar boards (for bottom support slats)
- 1x box 2.5” galvanized or stainless steel deck screws
- 1x box 4” galvanized or stainless steel lag screws (for attaching legs)
- Optional: Landscape fabric liner
- Estimated Material Cost (2026): $250
- Tools Required: Tape measure, pencil, speed square, miter saw, drill/driver, impact driver (for lag screws), level, clamps, safety glasses, ear protection.
- Build Time: 5-6 hours
- Skill Level: Intermediate
- 5-Step Build Summary:
- Cut All Pieces: From the 2x6x8s, cut two 4-foot lengths and two 2-foot lengths for each of the two bed layers (total four 4’ and four 2’ pieces). From the 4x4x8s, cut four 30-inch lengths for the legs. From the 2x4x8s, cut five 2-foot lengths for the bottom support slats.
- Assemble Bed Frame: Build the 4x2 bed frame using the 2x6s, creating two layers and securing them together as in previous plans. Ensure it’s square and sturdy.
- Attach Legs: Stand the bed frame on its side. Position a 30-inch 4x4 leg flush with each corner of the bed frame. Pre-drill and attach each leg to the frame using two 4” lag screws per side (total of four lag screws per leg, two into each 2x6 layer). Repeat for all four legs.
- Install Bottom Slats: Flip the bed upright. Measure and mark the inside bottom of the bed frame. Evenly space the five 2-foot 2x4 slats across the bottom, resting on the lower 2x6 frame. Secure each end of the slats to the 2x6 frame with 2.5” deck screws.
- Add Liner (Optional) & Final Check: If using, drape landscape fabric over the inside of the bed, allowing it to conform to the sides and bottom, and staple it in place. Ensure all screws are tight and the bed is level and stable.
6. Keyhole Permaculture Bed (Advanced)
Embrace permaculture principles with this innovative keyhole garden bed. Its circular (or octagonal) design with a central compost tube allows for continuous nutrient cycling, water conservation, and easy access to all plants. This is a more involved build, but highly rewarding.
- Dimensions: Approximately 6’ diameter (octagonal for easier build), with a 2’ diameter central compost tube. Height 22” (4 boards high).
- Lumber List:
- 10x 2x6x8 cedar boards
- 1x box 2.5” galvanized or stainless steel deck screws
- 1x roll hardware cloth (1/4” or 1/2” mesh, 24” wide x 6-8’ length) for compost tube
- Optional: 1x 4x4x8 cedar post (for internal corner bracing)
- Estimated Material Cost (2026): $280
- Tools Required: Tape measure, pencil, speed square, miter saw (with angle adjustment), jigsaw (for compost tube opening), drill/driver, level, clamps, angle finder, safety glasses, ear protection, heavy-duty snips (for hardware cloth).
- Build Time: 6-8 hours
- Skill Level: Advanced
- 5-Step Build Summary:
- Plan & Cut Octagon Sides: Decide on the size of your octagon (for a 6’ diameter, each of the eight sides will be approximately 2.3 feet long). Cut 32 pieces of 2x6 cedar to this length, making a 22.5-degree miter cut on each end.
- Assemble First Layer (Octagon): Lay out eight mitered 2x6 pieces to form the first octagonal layer. Pre-drill and secure the mitered joints with screws. Create a “keyhole” entrance by leaving a gap for the compost tube access path.
- Construct Compost Tube: Form a 2’ diameter cylinder from hardware cloth, overlapping and securing the ends with wire or small zip ties. Place it in the center of the octagon.
- Integrate & Stack Layers: Carefully stack the remaining three octagonal layers, staggering the joints. As you stack, integrate the compost tube by ensuring it remains centered and stable. Secure each layer to the one below with screws, and use internal 4x4 braces at key points for added strength.
- Final Secure & Finish: Ensure all layers are firmly connected and the structure is plumb and level. Trim any excess hardware cloth. The compost tube should extend to the top of the bed.
7. Rolling Caster Bed for Patios (Intermediate)
Bring your garden to your patio or deck with this versatile rolling raised bed. Equipped with heavy-duty casters, you can easily move your plants to catch the sun, protect them from harsh weather, or simply reconfigure your outdoor space.
- Dimensions: 3’ L x 2’ W x 16” H (Bed depth 11”, 5” for casters/frame).
- Lumber List:
- 2x 2x6x8 cedar boards (for bed frame)
- 1x 2x4x8 cedar board (for bottom frame/slats)
- 4x heavy-duty locking casters (rated for at least 100 lbs each)
- 1x box 2.5” galvanized or stainless steel deck screws
- 1x box 1.5” galvanized or stainless steel screws (for casters)
- Optional: Landscape fabric liner
- Estimated Material Cost (2026): $160
- Tools Required: Tape measure, pencil, speed square, miter saw, drill/driver, level, clamps, socket wrench (for casters), safety glasses, ear protection.
- Build Time: 3-4 hours
- Skill Level: Intermediate
- 5-Step Build Summary:
- Cut Bed Frame Pieces: From the 2x6x8s, cut two 3-foot lengths and two 2-foot lengths for each of the two bed layers (total four 3’ and four 2’ pieces).
- Assemble Bed Frame: Construct the 3x2 bed frame using the 2x6s, creating two layers and securing them together with screws at the corners and along the lengths. Ensure the frame is square and sturdy.
- Build Bottom Support Frame: From the 2x4x8, cut two 2-foot lengths for the end supports and three 2.5-foot lengths for the middle cross supports. Assemble these into a sturdy rectangular frame that fits snugly inside the bottom of your 2x6 bed frame, securing with 2.5” screws.
- Attach Bottom Slats & Base: Cut the remaining 2x4 cedar into 2-foot lengths to create slats for the bottom of the bed. Space these evenly across the 2x4 support frame and secure them with 2.5” screws. This forms the base for your soil.
- Install Casters: Flip the entire bed upside down. Attach one heavy-duty locking caster to each corner of the bottom support frame using 1.5” screws, ensuring they are securely fastened. Flip the bed back over, check for stability, and add the optional landscape fabric liner.
Related Reading
- 6 Best Cordless Leaf Blowers Under $200 (Tested)
- Best Stud Finders for Home DIY: Tested and Reviewed
- Companion Planting Chart: What to Grow Next to What
Frequently Asked Questions (FAQ)
1. What’s the best cedar grade for raised beds? Knotty cedar (often labeled Select Knotty or Standard & Better) is generally the best choice. It’s more affordable than clear cedar, readily available, and offers excellent natural rot resistance and durability for raised bed applications.
2. Do I need to line my cedar raised bed? Lining a cedar raised bed is optional. Cedar itself is naturally rot-resistant and won’t leach chemicals, so a liner isn’t necessary for wood preservation. However, a layer of landscape fabric at the bottom can help prevent soil from washing out through gaps, suppress weeds from growing up from below, and sometimes help retain moisture. Avoid plastic liners that can hinder drainage and aeration.
3. How do I prevent weeds in a raised bed? Start with a high-quality, weed-free soil mix. Lay landscape fabric at the bottom to block existing weeds. Once planted, apply a layer of organic mulch (like straw, wood chips, or shredded leaves) on top of the soil. This suppresses weeds, conserves moisture, and regulates soil temperature.
4. What kind of soil should I use in my raised bed? A good raised bed soil mix typically consists of:
- Topsoil (40-50%): Provides bulk and nutrients.
- Compost (30-40%): Adds organic matter, improves soil structure, and provides slow-release nutrients.
- Vermiculite or Perlite (10-20%): Improves drainage and aeration, crucial for root health. Avoid using pure garden soil, which can be too dense and may introduce weeds or diseases.
5. Can I use other wood types besides cedar? While cedar is highly recommended, you can use other untreated woods like redwood, cypress, or even untreated Douglas fir or pine. Redwood and cypress offer similar rot resistance to cedar but can be more expensive or harder to find. Untreated fir or pine will decompose much faster (often 3-5 years) due to their lack of natural preservatives, so be prepared for more frequent replacement. Avoid pressure-treated lumber for food gardens due to potential chemical leaching.
6. How high should my raised bed be? The ideal height depends on your needs:
- 11 inches (2 boards high): Good for most common vegetables and herbs, providing adequate root depth.
- 22 inches (4 boards high): Excellent for root crops (carrots, potatoes), maximizing drainage, and reducing bending.
- 30+ inches (waist-high): Ideal for accessible gardening, reducing strain, and for gardeners with mobility challenges.
7. How do I extend the life of my cedar raised bed? Cedar is naturally durable, but you can maximize its lifespan by ensuring good drainage (don’t let water pool inside or around the base), avoiding constant contact with overly wet soil (though cedar handles this well), and allowing it to weather naturally. Do not seal the interior, as this can trap moisture.
8. Where can I get the free PDF cut lists for these plans? You can download the free PDF cut lists for all 7 cedar raised garden bed plans directly from build-coded.com! Look for the download link at the top or bottom of this article. Happy building!