Why Macrame Is Worth Learning
Macrame is a craft that has been quietly doing its thing for centuries — sailors knotted it in their down time, it exploded in the 1970s, faded, and came roaring back about ten years ago. It has not left. You walk into any home store today and there are macrame plant hangers, wall hangings, and curtain tiebacks on the shelves. Good ones cost $40-80 at retail. You can make better ones yourself for under $20 in materials.
The real draw for me is that macrame requires almost nothing to start. A length of cotton cord, a dowel or branch to tie it to, and a pair of scissors. That is the whole supply list. No machines, no power tools, no complicated setup. You can practice on the couch while you watch TV.
This guide covers the seven essential knots that show up in 95% of macrame projects. Learn these and you can make wall hangings, plant hangers, belts, bracelets, and keychains. The skill compounds fast — your first project will take three times longer than your fifth.
What You Need to Get Started
Cord
Macrame cord comes in three main constructions, and choosing the right one makes a huge difference.
Single-strand cotton cord — This is the classic macrame cord. It is a bundle of cotton fibers with no twist or braiding, held together by the tension of the knot itself. When you cut the end, you can brush it out into a soft fringe. Beginners love this for the finish, but it is looser and less defined than other options. Good for wall hangings with fringed ends.
3-ply (or 3-strand) twisted cotton cord — Three strands of twisted cotton twisted together again. Holds knot shape beautifully, and you can unravel the end to create a wavy, textured fringe. My go-to for most projects. It is slightly more expensive than single-strand but worth it for how much cleaner the knots look.
Braided cotton cord — Tightly braided and the most durable. Holds its shape perfectly but cannot be brushed out into a fringe. Best for plant hangers, bag straps, and anything that will take stress.
For beginners I recommend starting with 3-ply twisted cotton cord in 4mm or 5mm thickness — this is the sweet spot for learning because the knots are large enough to see what you are doing, and the cord is easy to handle. A 100-meter roll of 4mm Single Twist Macrame Cord is around $15-20 and will last through many practice sessions and your first few real projects.
Other Supplies
- Wooden dowel or branch — A 12-18 inch wooden dowel (around 5/8 inch diameter) is the classic starting surface. Any hardware store sells them for under $3. Branches from the yard also work and give a more natural look.
- Scissors — Sharp ones. Dull scissors will crush and fray the cord ends.
- Measuring tape — For cutting cord to consistent lengths.
- S-hook or clothes hanger hook — To hang your dowel while you work. A garment rack or a wall-mounted hook is ideal.
- Wide-tooth comb or pet slicker brush — For brushing out fringed ends.
- Optional: masking tape — To tape cord ends and prevent fraying while you work.
A complete Macrame Starter Kit bundles cord, a dowel, and accessories for $20-30 and is honestly the easiest way to get started without hunting down components.
Setting Up to Practice
Before you learn the knots, set up a proper practice station. Hang your dowel at about chest height when you are seated — so your hands fall naturally at a comfortable tying position. If your dowel is too low you will hunch over and your back will regret it. Too high and your arms tire.
Cut four or six lengths of cord, each about 4 feet long, to use for practice. This gives you plenty of working length to tie the same knot several times in a row without running out.
Tie each cord onto the dowel with a lark’s head knot — which is coincidentally the first knot you will learn.
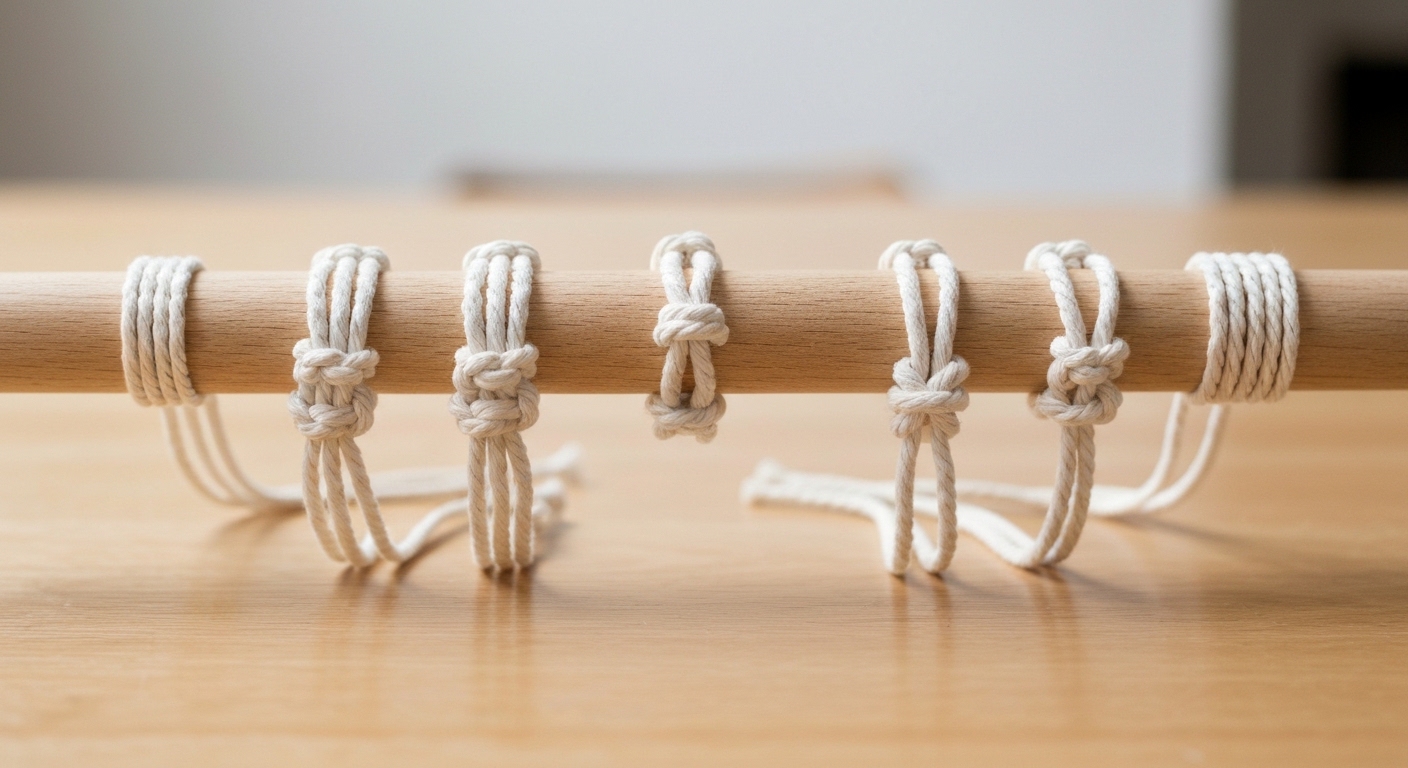
Knot 1: The Lark’s Head Knot
The lark’s head is how you attach cord to a dowel, a ring, or another cord. It is the foundation of almost every macrame project.
How to tie it:
- Take one cord and fold it in half, creating a loop at the top.
- Place the loop over the dowel, with the loop facing you and the two ends dangling behind the dowel.
- Reach behind the dowel and pull both cord ends through the loop.
- Pull tight.
You now have two strands hanging from your dowel, joined at the top by a neat little V-shape. That V is the lark’s head. Tie 4-6 of these in a row to practice — they should all look identical and sit evenly spaced.
Reverse lark’s head: Same knot, but the V-shape sits on the back of the dowel instead of the front. Useful when you want a cleaner front face on a wall hanging. Fold the cord, place the loop behind the dowel, pull ends through from the front.
Knot 2: The Square Knot
The square knot is the workhorse of macrame. You will tie thousands of them. It uses four cords — two working cords on the outside and two filler cords in the middle.
How to tie it:
- Start with four cords hanging in front of you.
- Take the left working cord and cross it over the two middle filler cords. It should now point to the right.
- Take the right working cord and cross it over the tail of the left cord, then pass it behind the fillers and up through the loop on the left.
- Pull both working cords tight. This is a half square knot — the first half.
- Now reverse: take the right working cord and cross it over the fillers (pointing left), take the left working cord over the tail, behind the fillers, and up through the loop on the right.
- Pull tight. This is a full square knot.
The knot should sit flat and symmetric. If it twists, you tied two half square knots of the same hand — see the next knot for why that matters.
Key tip: The working cords always cross OVER the fillers on top, and the fillers stay straight down the middle. Beginners often let the fillers cross and get a tangled mess. Keep those center strands boring and straight.
Knot 3: The Half Hitch
A half hitch is a single loop of one cord wrapped around another. Simple on its own, but the building block of several more complex knots.
How to tie it:
- You need two cords — a working cord and a holding cord.
- Hold the holding cord taut and mostly vertical (or horizontal, for diagonal patterns).
- Loop the working cord over and around the holding cord.
- Pass the working cord through its own loop.
- Pull tight so the knot sits against the holding cord.
One half hitch alone is not used much on its own, but two half hitches stacked make a full hitch, and rows of them make diagonal or horizontal design lines across your work.
Knot 4: The Spiral (Half Square Knot)
The spiral knot is what you get when you tie half square knots in the same direction repeatedly. Instead of lying flat like a full square knot, it twists into a beautiful helix.
How to tie it:
- Start with four cords, same setup as a square knot.
- Tie only the first half of a square knot — left cord over, right cord over the tail, behind, through the loop.
- Pull tight.
- Repeat the exact same half knot again. Same hand, same direction.
- Repeat 6-10 times.
After about 4-5 repetitions, the knots start twisting naturally into a spiral. Let them. Do not try to force them flat — that is the entire point of this knot. About every 6 half knots, you will want to rotate the work a quarter turn to keep the spiral going in the same direction.
Spiral knots are the signature look of plant hangers and bracelets. A row of 15-20 half knots creates a dramatic corkscrew texture that looks far more complex than it is.
Knot 5: The Double Half Hitch
The double half hitch is how you make clean horizontal and diagonal lines across your work. It looks intimidating but is just a half hitch tied twice in a row around the same holding cord.
How to tie it:
- Choose a holding cord. For a horizontal line, this is usually the leftmost or rightmost cord in your group, held across the others.
- Take the next cord to the right (or left) — this is your working cord.
- Loop the working cord over the holding cord and pass the end up through the loop it just made. Pull tight.
- Loop the same working cord over the holding cord a second time, same direction, and pull tight.
- You have one double half hitch. The working cord now hangs straight down, and the holding cord has a small knot bump on it.
- Take the next cord and repeat, using the same holding cord.
A row of double half hitches across the full width of your work creates a crisp horizontal line that cleanly separates one design section from another. Run the holding cord at a diagonal instead and you get a diagonal line — the foundation of chevron and diamond patterns.
Knot 6: The Gathering Knot
Also called the wrap knot. This is the finishing knot you see at the bottom of plant hangers and the tops of bundled fringes — a tight wrap that holds a bundle of cords together.
How to tie it:
- Take all the cords you want to gather into a bundle.
- Cut a separate piece of cord about 18-24 inches long — this is your wrapping cord.
- Fold the wrapping cord into a narrow U-shape. Lay it against the bundle so the loop of the U sticks out above and one tail hangs below, with the rest of the wrapping cord forming a long loop against the bundle.
- Start wrapping the long tail tightly around the bundle and the U-shape, working downward. Keep wraps neat and tight against each other.
- Wrap 8-15 times depending on how chunky you want the gathering to look.
- Pass the end of the wrapping cord through the remaining loop of the U at the top.
- Pull the lower tail (the one that has been hanging out the bottom all along) sharply downward. This drags the upper loop down and locks the end of your wrapping cord inside the wrap.
- Trim the excess wrapping tails flush.
Done correctly, you get a seamless cylindrical wrap with no visible start or end. This is the knot that holds plant hangers together at the bottom where all the cords meet.
Knot 7: The Crown Knot
The crown knot is the four-cord braided knot that creates a square cross-section when tied repeatedly down a rope. You see it at the end of lanyards, keychains, and decorative ropes — it looks like a tight four-sided braid.
How to tie it:
- Start with four cords, spaced roughly at 12, 3, 6, and 9 o’clock positions around a central point. It helps to imagine (or actually use) a small ring or cross shape to hold them.
- Take the cord at 12 and fold it down over the center, pointing toward 6.
- Take the cord at 3 and fold it left over the first cord, pointing toward 9.
- Take the cord at 6 and fold it up over the second cord, pointing toward 12.
- Take the cord at 9 and fold it right over the third cord — and pass the tail through the loop formed by the first cord at the top.
- Pull all four cords tight and evenly. The knot should sit flat and square.
Repeat this pattern consistently and you get a tight four-strand square braid. Rotate direction each time (clockwise, then counterclockwise) for a round rope look, or keep the same direction for a spiral.
Crown knots are overkill for most wall hangings, but they are essential for keychains, lanyards, and decorative cord work.
Rope Type Comparison for Beginners
Now that you know the knots, here is how cord type affects each one.
| Cord Type | Square Knot | Spiral | Double Half Hitch | Fringe |
|---|---|---|---|---|
| Single-strand cotton | Soft, slightly fuzzy | Loose helix | Adequate | Excellent — brushes out beautifully |
| 3-ply twisted cotton | Crisp and defined | Clean helix | Very clean lines | Good — makes wavy texture |
| Braided cotton | Rigid and sharp | Tight helix | Sharpest lines | Cannot be brushed out |
For learning, 3-ply twisted is the best all-rounder. For a wall hanging with a heavy fringe, single-strand wins. For a plant hanger that needs to bear weight, braided is the pick.
Your First Project: A Simple Wall Hanging
Once you can tie the seven knots cleanly, put them together in a beginner wall hanging. Here is the recipe.
Supplies:
- One 14-inch wooden dowel
- Eight 8-foot lengths of 4mm cord
Steps:
- Fold each cord in half and lark’s head them onto the dowel. You now have 16 working strands.
- Group the strands in sets of four.
- In the first set of four, tie 4 square knots in a row.
- In the second set, tie a spiral knot (15-20 half knots).
- In the third set, tie 4 square knots.
- In the fourth set, tie a spiral knot.
- Skip a few inches. Starting from the left, tie a diagonal row of double half hitches across all 16 strands — left to right.
- Below that, tie another diagonal row, right to left, forming a V.
- Leave the rest of the cord hanging as fringe. Trim in a V or straight line across the bottom.
- Brush out the fringe with a wide-tooth comb if you are using single-strand cord.
That is a completed wall hanging using four of the seven knots. Hang it on a wall, step back, and you will feel disproportionately accomplished.
Common Beginner Mistakes
- Uneven tension — Your knots should all be pulled to the same tightness. Inconsistent tension is the number one reason beginner work looks sloppy.
- Wrong cord length — A good rule of thumb: cut your cord 4x the finished length of your project. Double that if you are using the cord folded over a lark’s head.
- Not combing the fringe — If you are using single-strand cotton, the fringe at the bottom needs to be brushed out and trimmed. Un-brushed fringe looks like a mistake.
- Skipping the dowel setup — Tying knots on a cord lying flat on a table is ten times harder than tying on a hanging dowel. Set up properly before you start.
Final Thoughts
Macrame rewards patience and repetition more than talent. The seven knots in this guide are the entire vocabulary of the craft — everything you see in even the most elaborate wall hanging is some combination of these, tied in a clever sequence. Once the muscle memory sets in, you can look at a pattern and see the knots inside it like words in a sentence.
Start with a cheap roll of 3-ply cotton, a $3 dowel, and one hour to practice. By the end of the afternoon you will have a wall hanging that looks like something from a store shelf — and you will know exactly how it was made because you just made it.